.webp)
HOME TIPS HOW TO CROCHET A PURSE: STEP-BY-STEP GUIDE FOR BEGINNERS
How to Crochet a Purse: Step-by-Step Guide for Beginners
Written by Erin Sullivan
Are you ready to create something both practical and beautiful? Crocheting your own purse is not only a fun and rewarding project but also a fantastic way to express your personal style. Whether you’re a complete beginner or looking to expand your crochet skills, this step-by-step guide will walk you through everything you need to know to make a stunning handmade purse.
In 2024, searches for “crochet purse patterns” have surged by over 40%, as more people embrace sustainable fashion and DIY crafts. By learning how to crochet a purse, you’ll not only save money but also create a unique accessory that’s tailored to your taste. Plus, it’s a great way to use up leftover yarn from other projects!
In this guide, you’ll learn:
The essential materials and tools you’ll need to get started.
Basic crochet stitches (with tips for perfecting your technique).
A simple, beginner-friendly pattern to create your first purse.
Creative ideas to customize your design and make it truly one-of-a-kind.
No prior experience? No problem! This tutorial is designed with beginners in mind, so you can follow along easily and confidently. Let’s grab your hook and yarn—it’s time to crochet a purse you’ll be proud to show off!

Materials and Tools Checklist
Before you start crocheting your purse, it’s important to gather all the necessary materials and tools. Don’t worry—you won’t need anything fancy or expensive! Here’s a simple checklist to ensure you’re fully prepared:
Essential Supplies
Crochet Hook:
A 4mm or 5mm hook is ideal for most medium-weight yarns. If you’re using thicker or thinner yarn, adjust the hook size accordingly.
Yarn:
Medium-weight (worsted) cotton or acrylic yarn is perfect for beginners. Cotton is durable and easy to work with, while acrylic is soft and comes in a wide range of colors.
How much yarn? For a small to medium-sized purse, one skein (about 200-300 yards) should be enough.
Scissors:
A sharp pair of scissors is essential for cutting yarn cleanly.
Yarn Needle:
A blunt-tipped yarn needle (also called a tapestry needle) is used for weaving in ends and sewing pieces together.
Stitch Markers:
These help you keep track of the beginning of each round, especially if you’re working in a circle.
Optional (But Helpful) Supplies
Lining Fabric:
If you want your purse to hold its shape better, consider adding a fabric lining. Cotton or felt works well.
Decorative Accessories:
Buttons, beads, tassels, or embroidery thread can add a personal touch to your design.
Measuring Tape:
Useful for checking the size of your purse as you work.
Stitch Counter:
If you’re new to crochet, a stitch counter can help you keep track of your rounds.
Pro Tips for Choosing Materials
Yarn Color: If you’re a beginner, opt for a light-colored yarn. It’s easier to see your stitches and correct mistakes.
Hook Comfort: Choose a hook with an ergonomic handle if you plan to crochet for long periods—it’s easier on your hands.
With these supplies in hand, you’re ready to start crocheting! In the next section, we’ll review the basic stitches you’ll need to complete your purse.
Basic Stitch Refresher
Before diving into the purse project, let’s quickly review the basic crochet stitches you’ll need. If you’re already familiar with these stitches, this will serve as a helpful refresher. If you’re new to crochet, don’t worry—these stitches are easy to learn and perfect for beginners!
1. Chain Stitch (CH)
The chain stitch is the foundation of most crochet projects. Here’s how to make it:
Make a slip knot and place it on your hook.
Yarn over (wrap the yarn around the hook from back to front).
Pull the yarn through the loop on your hook.
Repeat to create as many chains as needed.
Pro Tip: Keep your tension even—not too tight, not too loose. This will make it easier to work into the chains later.
2. Single Crochet (SC)
The single crochet stitch is simple and creates a tight, sturdy fabric—perfect for purses!
Insert your hook into the second chain from the hook.
Yarn over and pull up a loop (you’ll have two loops on your hook).
Yarn over again and pull through both loops.
Repeat across the row.
Pro Tip: Use a stitch marker to mark the first stitch of each row. This helps you keep track of where to start the next row.
3. Double Crochet (DC)
The double crochet stitch is taller and works up quickly, making it great for adding height to your project.
Yarn over, then insert your hook into the next stitch.
Yarn over and pull up a loop (you’ll have three loops on your hook).
Yarn over and pull through the first two loops.
Yarn over again and pull through the remaining two loops.
Repeat across the row.
Pro Tip: Practice these stitches on a small swatch before starting your purse. This will help you get comfortable with the motions and tension.
4. Slip Stitch (SL ST)
The slip stitch is often used to join rounds or finish edges.
Insert your hook into the next stitch.
Yarn over and pull the loop through both the stitch and the loop on your hook.
Pro Tip: Slip stitches are also great for creating a neat, finished edge on your purse.
Why Practice Matters
If you’re new to crochet, take a few minutes to practice these stitches. You can create a small swatch (about 10 chains wide) to get the hang of the movements. Remember, crochet is all about muscle memory—the more you practice, the easier it becomes!
Now that you’re familiar with the basic stitches, you’re ready to start crocheting your purse. In the next section, we’ll walk through the step-by-step process.
Step-by-Step Crochet Tutorial
Now that you’ve gathered your materials and practiced the basic stitches, it’s time to start crocheting your purse! Follow these easy steps to create a beautiful, functional purse from scratch.
Step 1: Crochet the Purse Base
The base of your purse will determine its size and shape. For this tutorial, we’ll create a simple round base.
Start with a Magic Ring:
Make a magic ring (or chain 4 and join with a slip stitch to form a ring).
Chain 1 (this does not count as a stitch).
Round 1:
Work 6 single crochet (SC) stitches into the ring.
Join with a slip stitch to the first SC. (6 stitches total)
Round 2:
Chain 1, then work 2 SC into each stitch around.
Join with a slip stitch. (12 stitches total)
Round 3:
Chain 1, then alternate 1 SC and 2 SC in each stitch around.
Join with a slip stitch. (18 stitches total)
Continue Increasing:
Keep increasing evenly in each round until the base reaches your desired size (e.g., 5-6 inches in diameter for a small purse).
Pro Tip: Use a stitch marker to mark the first stitch of each round. This helps you keep track of where to join.
Step 2: Crochet the Purse Body
Once the base is complete, you’ll work upward to create the body of the purse.
Round 1 of the Body:
Chain 1, then work 1 SC in each stitch around.
Join with a slip stitch.
Continue Working in Rounds:
Repeat Round 1 until the body reaches your desired height (e.g., 6-8 inches for a small purse).
Optional Design:
To add texture, switch to double crochet (DC) stitches for a few rounds.
For stripes, change yarn colors at the beginning of a round.
Pro Tip: If your purse starts to curl, try using a slightly larger hook or loosening your tension.
Step 3: Finish the Edging and Add Handles
The final touches will give your purse a polished look and make it functional.
Edging:
Work a round of slip stitches (SL ST) around the top edge to create a clean finish.
Handles:
Cut three strands of yarn, each about 3 times the desired handle length.
Braid the strands together and attach them to the purse.
Chain 60 stitches (or enough to reach your desired handle length).
Attach the chain to the sides of the purse using slip stitches.
Option 1: Chain Stitch Handle:
Option 2: Braided Yarn Handle:
Pro Tip: For extra durability, reinforce the handles by sewing them in place with a yarn needle.
Step 4: Personalize Your Purse
Make your purse truly unique with these creative ideas:
Add a Button Closure:
Sew a button to the front of the purse and create a small loop on the flap to secure it.
Embellish with Tassels or Pom-Poms:
Attach tassels to the corners or a pom-pom to the center of the purse.
Experiment with Colors:
Use variegated yarn for a gradient effect or alternate colors for stripes.
Pro Tip: If you’re adding a lining, measure the base and body of your purse, cut fabric to size, and sew it in place using a yarn needle.
What’s Next?
Congratulations—you’ve just crocheted your very own purse! In the next section, we’ll answer some common questions to help you troubleshoot and refine your skills.
Frequently Asked Questions
As you work on your crochet purse, you might run into a few questions or challenges. Don’t worry—this section covers the most common issues and provides practical solutions to help you succeed!
Q1: My stitches are too loose or too tight. What should I do?
Solution: Stitch tension is a common challenge for beginners. If your stitches are too loose, try using a smaller hook or tightening your grip on the yarn. If they’re too tight, switch to a larger hook or relax your hands while crocheting.
Pro Tip: Practice on a small swatch to find the tension that works best for you.
Q2: How can I make my purse more durable?
Solution: To add strength and structure:
Use double-stranded yarn (hold two strands together while crocheting).
Add a fabric lining to the inside of your purse.
Reinforce the handles by sewing them securely with a yarn needle.
Pro Tip: Choose a sturdy yarn like cotton or acrylic for long-lasting results.
Q3: My purse is curling. How do I fix it?
Solution: Curling usually happens when stitches are too tight or the hook size is too small. To fix it:
Block your finished purse by wetting it slightly and shaping it flat to dry.
Switch to a larger hook for the next project.
Pro Tip: If you’re already mid-project, try loosening your tension for the remaining rounds.
Q4: How do I change colors for stripes or patterns?
Solution: To change colors:
Work the last stitch of the current color until two loops remain on the hook.
Yarn over with the new color and pull through both loops.
Continue crocheting with the new color.
Pro Tip: Weave in the ends of the old color as you go to save time later.
Q5: Can I make my purse bigger or smaller?
Solution: Absolutely! To adjust the size:
For a larger purse, increase the number of stitches in the base rounds.
For a smaller purse, reduce the number of stitches or use a finer yarn and smaller hook.
Pro Tip: Measure the base as you go to ensure it’s the size you want before moving on to the body.
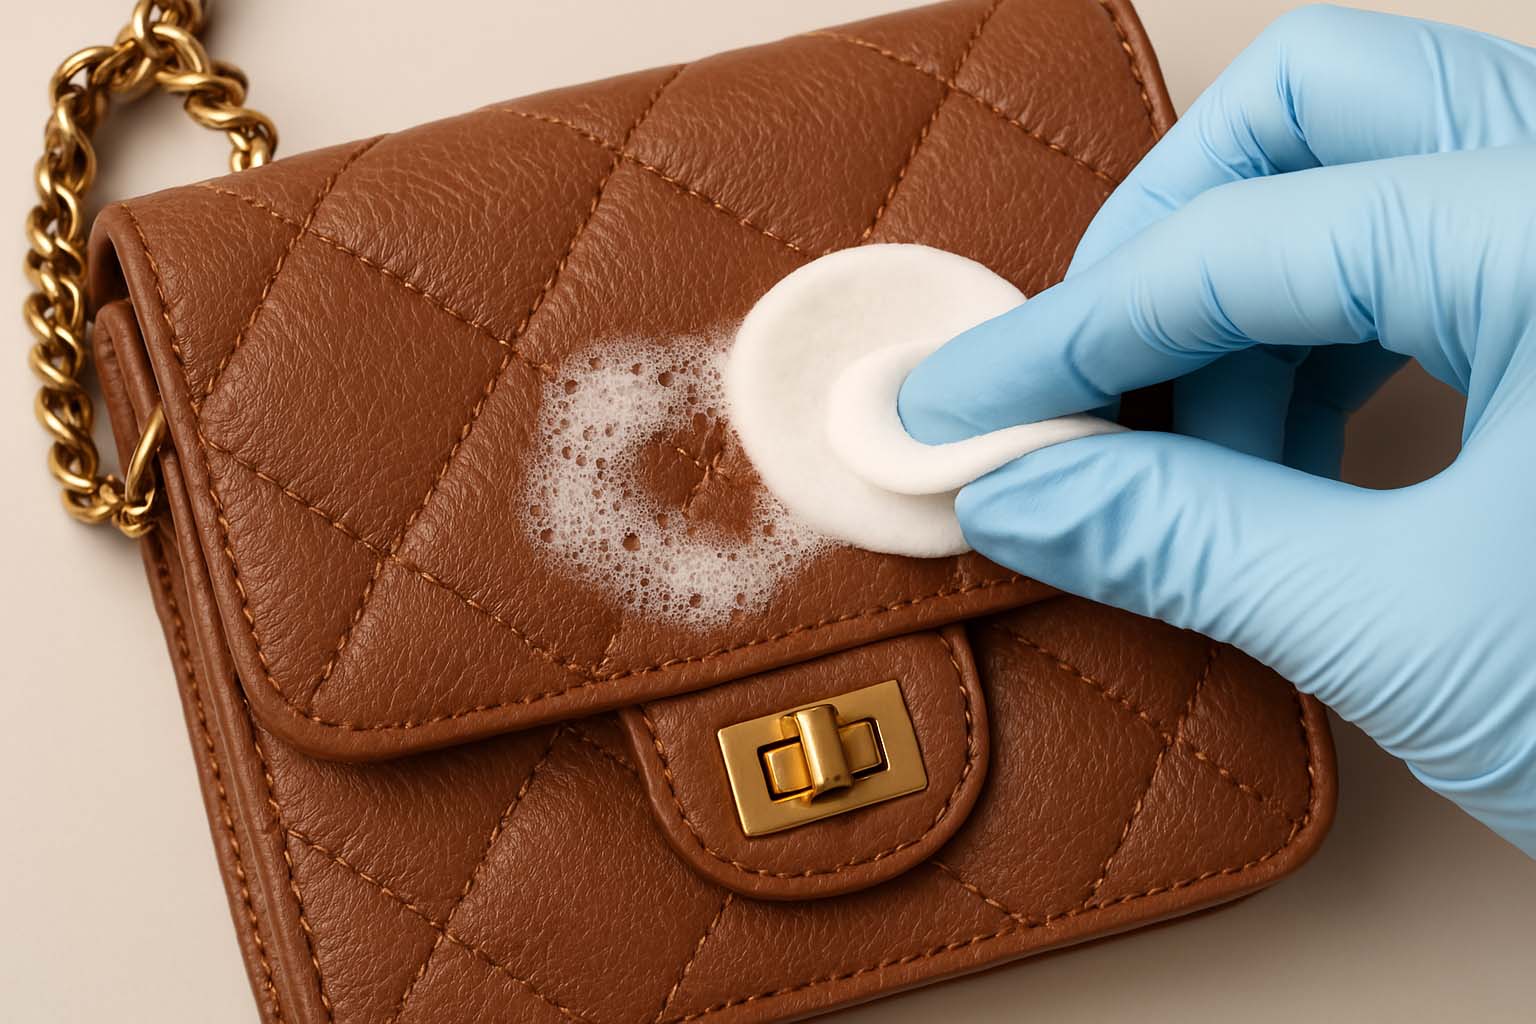
Q6: How do I clean my crochet purse?
Solution: Hand-washing is the safest method:
Fill a basin with lukewarm water and a small amount of mild detergent.
Gently agitate the purse in the water, then rinse thoroughly.
Lay it flat on a towel to dry, reshaping it as needed.
Pro Tip: Avoid wringing or twisting the purse, as this can distort its shape.
Q7: What if I make a mistake?
Solution: Mistakes happen! Here’s how to fix them:
For a missed stitch, use a crochet hook to pick up the stitch and continue.
For a major error, carefully unravel (“frog”) your work back to the mistake and re-crochet.
Pro Tip: Count your stitches at the end of each round to catch mistakes early.
Advanced Tips and Design Ideas
Now that you’ve mastered the basics, it’s time to take your crochet purse to the next level! Whether you’re looking to experiment with new techniques or add a personal touch, these tips and ideas will help you create a truly unique accessory.
1. Experiment with Different Shapes
Round Purse: Follow the tutorial above for a classic, versatile shape.
Rectangular Purse: Start with a chain the width of your desired base, then work rows of single crochet (SC) or double crochet (DC) to build the body.
Hexagonal Purse: Increase in multiples of six for a geometric look.
Pro Tip: Use stitch markers to keep track of corners and ensure even shaping.
2. Play with Texture and Stitch Patterns
Shell Stitch: Create a scalloped edge or body by working clusters of double crochet stitches.
Popcorn Stitch: Add a 3D texture by grouping several DC stitches together and pulling them into a “popcorn” shape.
Cable Stitch: For an intricate look, try crocheting cables by crossing stitches over each other.
Pro Tip: Pair textured stitches with a simple yarn color to let the pattern shine.
3. Add Functional Features
Zipper or Button Closure: Sew a zipper or button onto the top edge for a secure closure.
Inner Pockets: Crochet small pouches and sew them inside the purse for organization.
Adjustable Strap: Use a long chain stitch or braided yarn to create a crossbody strap.
Pro Tip: For a professional finish, line the inside of your purse with fabric before adding pockets.
4. Get Creative with Yarn
Variegated Yarn: Use self-striping or gradient yarn for a colorful, no-fuss design.
Metallic or Glitter Yarn: Add a touch of sparkle for a glamorous evening purse.
Thick and Thin Yarn: Experiment with bulky yarn for a chunky, trendy look.
Pro Tip: Combine different yarn types (e.g., cotton and wool) for a unique texture, but make sure they have similar care instructions.
5. Embellish Your Purse
Tassels and Pom-Poms: Attach them to the corners or the zipper pull for a playful touch.
Embroidery: Add floral designs, initials, or geometric patterns with embroidery thread.
Beads and Sequins: Sew them onto the surface for a bit of sparkle.
Pro Tip: Use a yarn needle to securely attach embellishments, especially if the purse will hold heavy items.
6. Try Advanced Techniques
Filet Crochet: Create lace-like patterns by combining open and closed mesh stitches.
Tunisian Crochet: Use a Tunisian hook to create a dense, woven fabric perfect for structured purses.
Colorwork: Experiment with tapestry crochet to incorporate intricate designs and patterns.
Pro Tip: Start with small swatches to practice these techniques before applying them to your purse.
7. Make It Your Own
Custom Size: Adjust the base and height to create a clutch, tote, or crossbody bag.
Mix and Match: Combine different stitches, colors, and textures for a one-of-a-kind design.
Gift Idea: Personalize a purse with the recipient’s favorite colors or embellishments.
Pro Tip: Take notes as you work so you can recreate your favorite designs in the future.
What Will You Create?
The possibilities are endless when it comes to crocheting a purse. Whether you stick to the basics or dive into advanced techniques, the most important thing is to have fun and let your creativity shine. Share your finished projects in the comments—I’d love to see what you make!
Related Articles


Help Center
Copyright © PETITE SIMONE 2025 All Rights Reserved.